


QC Conveyors’ online Conveyor Configurator is designed as an easy-to-use tool to help customers find exactly the right conveyor for the application, get a quote and download CAD models. While configuration is intuitive, this guide serves as an introduction for new users and introduces some tips and tricks that may not be as obvious.
- Register/Log In
Enter your username and password to log in or create a new account

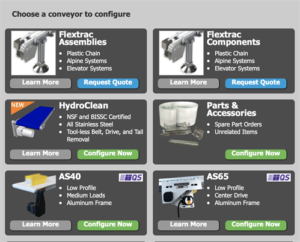
- Choose “Configure Now”
Navigate to the AS40 section and click “Configure Now”

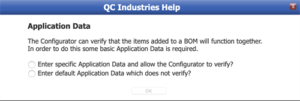
- Choose to enter application data
We strongly recommend opting to enter your application data so the Configurator can verify that the components will work together properly for your application.

- Enter application data
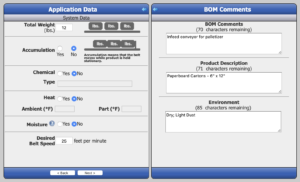
The Configurator asks some basic questions about your application, including:- the total maximum load that will be on the conveyor at one time
- whether or not accumulation will be involved
- whether the conveyor will be exposed to chemicals, heat or moisture
- desired belt speed in FPM (our conversion tools can help you convert from other units)
You may also enter notes about the product/application

- Choose conveyor specifics
Choose whether the conveyor will be pushing or pulling and which side the motor will be mounted
Choose width and length
Enter infeed and discharge heights
Note that most choices on this screen have an effect on the conveyor’s load capacity. The graph on the right shows the available load for each width, the load (or effective load if you’ve chosen an incline or decline), and how those relate.

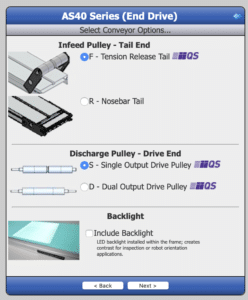
- Choose conveyor options
Choose a Tension Release Tail or Nosebar Tail
Choose a single or dual-output drive pulley (dual output pulleys are used for gang-driving applications or for a shaft encoder)
Choose whether a backlight will be installed
Note that choices marked with the “QS” icon are in stock and available as part of our Quick Ship program

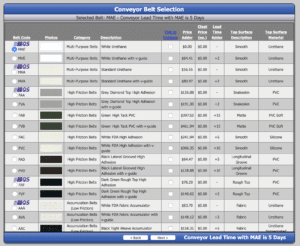
- Choose a belt
All available belts are listed with specifications (more are available by scrolling to the right). You’ll also see how the belt effects the conveyor’s lead time and price.
Narrow down the belts you’re interested in by clicking the checkboxes, then click “Click to Compare” at the top to filter the list to just those belts. - Review and add the conveyor to your BOM
A spare belt is also automatically added for reference, but is not included in the total price by default - Click Drive (if desired; otherwise move to step 14)
- Enter Drive Data
Choose the approximate number of hours the gearmotor will run each day
Enter the number of starts and stops per hour
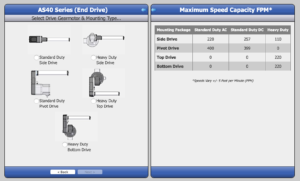
- Choose a mounting type
The chart on the right shows the maximum speed for each mounting
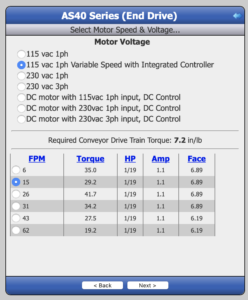
- Choose gearmotor
Choose the incoming motor voltage/phases; AC motors are listed first followed by DC
The gear ration that gets closest to the speed you entered in the application data will be selected automatically, but you are free to adjust this to a gear ratio with a different speed if desired.
For DC motors, select a controller mounting option: an enclosure that can mount directly to our stand extrusion, a bracket for installation in a panel, or your own solution.
Accessories (e.g., extension cables) may appear and be selected at the bottom of this screen. - Review and add the gearmotor to your BOM
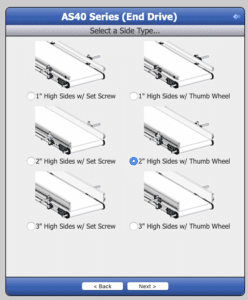
- Click Sides/Guides (if desired; otherwise move to step 18)
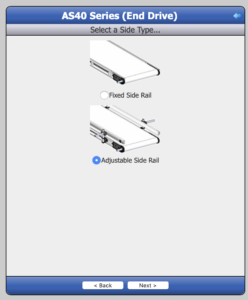
- Choose fixed side rails or adjustable guides
- Choose height and style
- Review and add sides/guides to your BOM
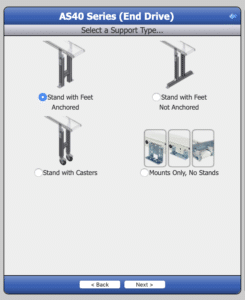
- Click Supports (if desired; otherwise move to step 21)

- Choose a stand type or mounts
A recommended stand package will be chosen automatically based on the application data you’ve entered
Mounts will allow you to choose between standard mounts or raised mounts. - Review and add supports to your BOM
- Download CAD and Spec Sheets
Click the “Download” tab and check any CAD models, 2D drawings, exploded views and spec sheets you’d like to download then click Download at the bottom. A ZIP file will be created and the download will begin. - Click “Request Price”
Enter any special instructions and click Submit to send your price request to your local distributor. Each request is reviewed for errors by our staff, so please allow up to one business day for a response.


Tips & Tricks
- Some changes (such as width and length) may be made directly from the BOM list. Mouse over the item you’d like to change and click “Edit”
- Items may be rearranged in the list by mousing over them and choosing “Move Up” or “Move Down”
- Bills of Materials can be renamed by clicking the name just under the quote number. This allows the conveyor to be named better to match up with your internal notation (e.g., “infeed conveyor”)
- An entire BOM may be copied by visiting Tools > Copy BOM. This is useful when creating multiple similar conveyors that only have slight variations (e.g., length).
- The quote window may be expanded to make it easier to read by clicking the arrow in the upper left
- A new BOM may be created by choosing the “New BOM” tab at the top of the screen. Quotes may contain multiple BOMs, with each BOM containing a different conveyor that can be from any of our configurable series.
Errors and Warnings
The panel at the bottom of the screen may include errors and warnings that must be acknowledged before a price may be requested. Options will appear for correcting those errors automatically. Errors typically occur when edits are made after items are added to the BOM, for instance changing the width of the conveyor will prompt an error when the stand width doesn’t match the conveyor width.
Help!
If you ever have a question about the Conveyor Configurator, please reach out to our Applications Engineering department at (513) 753-6000 or using our contact form. They are happy to walk you through configuring a conveyor!